The Quest for Amber...
The North American (NA) spec taillights on the Spark have three lights arranged vertically. The top light is a 7443 running/brake light. The middle light is a 7443 running/brake/turn signal. The bottom light is the reverse light. The top two lights are red:
The rest of the planet seems to get amber turn signals:
I found a set of taillight lenses from Korea via eBay:
 |
| They're play and plug! :) |
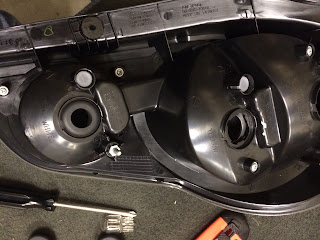
They were expensive (<$255/pr). When they arrived, I noticed that they came with wiring harnesses and bulbs. However, the mounting holes for the sockets were not the same as the NA version; they were bigger. Further, the plug on the harness that would mate with the car's wiring harness was different. Total mismatch (no pix of the wiring harnesses...forgot to take them!):
I sent those lenses back to Korea.
I kept searching and found that the European Sparks had amber turn signals; they were also much cheaper on eBay.uk, so I ordered a set...one from UK and one from Germany:
These lenses had the large holes, too! No wiring harnesses were included. Rats!
Hmmm. Well, I had to think about this for a day or two. I wanted to keep the lenses, but how to mate the NA wiring harness with the Euro lenses?
I did not want to cut any wires on my Spark EV so I came up with a solution (perhaps a temporary one since I ordered a couple of used Euro wiring harnesses).
I bought some 3/4" grommets at Home Depot in the electrical dept where the low voltage wire supplies are stashed...:
...removed some material from the ID of the grommet to allow the LED + socket to fit through...:
...and used the grommets to "shrink" the mounting holes so that the NA wiring harness sockets would fit. It's semi-permanent and I can change it back anytime (I also cut two of the grommets into semi-circles to achieve the same effect).
This allowed the NA wiring harnesses to mate with the Euro lenses in a rather inelegant mounting system. They're secure and since they're rubber mounted, shocks and vibration are not a worry.
The morning after I finished this part of the project, as I was waking up, I realized that the lights/sockets were a little less protected from the weather than with the original mounts, since the original mounts were twist-lock types with rubber o-rings to seal out moisture, and the modified mounts are not. I'll address that issue later.
Let's continue...
The top light is a 7443 type, which means that it has two filaments. I replaced the original incandescent with an LED replacement; plug and play.
The middle light is also a 7443 lamp. A 7440 bulb (single filament) will not work because the electrical contacts won't align...well, it won't if it is incandescent. I verified this with a 7440 Sylvania Silver Star incandescent bulb. In fact, it wouldn't even fit in the socket.
I tried a 7440 LED and it worked, but as expected, the flash rate was too high (remember, I am changing the middle light to eliminate the running/brake light so that it is just an amber turn signal).
The flash rate is too high because the LED doesn't offer adequate electrical resistance for the flasher to work correctly. This can be corrected with an inline resistor. I may go that route later, but for now, the turn light will remain incandescent.
In order to use a 7440 bulb in the turn signal position, I broke off one "tang" of a 7443 bulb so that only one filament would light. I had to figure out which filament I wanted to defeat; I temporarily installed the bulb in the socket and fired up the car. Activated the turn signal so that I could watch the light flash, and discovered which tang should be cut:
 |
| Break off this tang... |
Now, only one filament gets current. Repeat for the other lamp.
The reverse LED is also plug and play. Simple.
The used wiring harnesses have not arrived as of this writing; I plan to examine them to see if they can be modified to work with my car's wiring harness. For now, the final product, in stages:
 |
| Et Voila! |
Once I get the wiring harnesses, I'll have a better idea of whether they'll be useful or not. Again, I didn't want to permanently alter the car if possible; hence, the used wiring harnesses. I can cut them to my little heart's content and only be out $15 :). If the Euro wiring harnesses are not compatible, I may buy two NA-spec wiring pigtails and modify them by cutting off the sockets of the Euro pigtails and splicing them into the NA pigtails. Stay with us... :)
*Update 12/06/16: The Euro wiring harnesses were incompatible, so they are useless. I'm sticking with the mod as-is; it seems to be working perfectly.
*Update 12/06/16: The Euro wiring harnesses were incompatible, so they are useless. I'm sticking with the mod as-is; it seems to be working perfectly.


